Saturday, June 29, 2013

Learning how to grow potatoes Part 2 by A. Nonymus

Planting Fingerlings

I pre-sprouted the fingerlings in an old egg carton in a process know as 'chitting' – a way of creating green sprouts prior to planting - it was recommended to separate by colors and not let them touch each other. They had been mixed when I got them, but I separated by colors. It only took about a week for the fingerlings to begin sprouting in the egg carton. The yellow and red sprouted quickly. The blues didn't sprout but they got planted anyway.

Once they started showing shoots in the egg carton, I planted them in the 3 bags, one bag with the yellow, one bag with the red, and one with the blue. I rolled the bag sides down, like old socks, and filled each with about 6” of garden soil and straw mixture.

From the very start, the yellow fingerlings seem the more robust, with the reds not far behind. The blues are much slower and may not do so well.

After about 6 weeks, it's time to add more soil to the bags to keep the stems covered. And this is the brilliant part: roll up the bags as the dirt is added to keep the stems covered constantly as they grow. When the bag is completely unrolled and filled to the top with soil/straw mix, the stems will have been kept covered to the 'max', which in theory, provides maximum yield. So far everything is going to plan.

I'm not really sure yet when to harvest potatoes, but one source suggested waiting until the top growth is dead, and another source suggests harvest as they grow to induce more tubers. I'm leaning toward the view that its best to just wait until the plants and leaves die completely, which provides maximum energy and growth time to the tubers... and lets face it, it's a lot easier on the harvester too.

[Editor's note: This story is Part 2 of 3 and was written by A. Nonymus.]


Fingerlings
Fingerlings

Wednesday, June 26, 2013

So How Does YOUR Garden Grow?

A. Nonymus

We have a robust and vigorous garden this year – with some special projects and new frontiers to conquer. Everything is in containers and the garden is thriving.

In spite of crazy Gulf Coast storms, unseasonable cold and early heat, bad techniques by the farmer, false starts, sundry bugs, birds, over watering, and haphazard fertilizing, the container garden is just thriving beyond any reasonable expectations, reminding me of the line in Jurassic Park... “life will find a way”!. Ain't it the truth!?

Our containers use commercial garden soil, some also mixed with water retaining soil mix. Most veggies are in good ol' garden soil. All the potatoes are layered in a mix of garden soil and straw. I'm using a granulated (dissolve in water to apply) fertilizer about every 2 weeks (when I remember).

As a first, we have been having fun with potatoes this season. Our first ever effort with potatoes on any 'serious' level. Many years ago I had tossed some seed eyes in the ground, and got a few puny potatoes. The results were so disappointing I never tried again. However, this year – on a whim - I decided to try again with a bit more serious effort.

I'm growing the potatoes in containers; some in large tubs, and others in bags. I'm really focusing on the “bag” system, which so far has exceeded any expectations by a mile. All the fingerlings are in burlap bags, and the Idaho's are in the big 5 gallon containers. I'm really pleased that all of the 'taters' seem to be thriving, much to my astonishment. I have been learning more than I ever expected about growing potatoes.

Happy gardening!


Cucumbers
Cucumbers


Saturday, June 22, 2013

Learning how to grow potatoes Part 1 by A. Nonymus

In researching how to grow potatoes in a container, I found a lot of great information online, and discovered that one person had great success with fingerlings in bags. I scrounged up 3 old burlap bags and followed the instructions on a YouTube video, filling the bags with a mixture of straw and garden soil to about 6” deep to start. The plan is to add soil and roll up the sides of the bag as the stalks grow. Then we planted each whole fingerling about 10 per bag, and covered by several inches of soil mix.

I learned that it's important to keep piling soil up around the stem of the potato plant – which induces more potatoes, as the tubers grow from the covered stalk. The bag system is perfect, since you roll down the sides of the bag to start, but then add dirt as the stems grow unrolling the bag upward. In theory, when the bag is fully unrolled and full, you will have a nice yield from each plant.

This concept of mounding dirt around the plant stem is also applied to the 'garbage can' system. Start with a little dirt in the bottom, and keep filling as plants grow. Tip the can over to harvest. Of course the can needs good drainage. Some special tubs are available online, but I think I'll get a 40 gal. plastic trash can and drill good drain holes at the bottom along the sides for next year.)

But just try to find burlap bags!

After asking all around and calling various vendors with no luck or leads, I finally got lucky at a local feed store, and they gave me 3 old burlap feed bags. I was surprised that I couldn't find burlap bags anyplace. Problem solved this year, by a stroke of luck.

I recently found a source online for reusable 'potato' bags made exactly for container potatoes. I'm sure that next year I will give those a try, as it's already apparent that burlap, at best, is a one season use item.

After 2 months, the bags are holding – but just. So next year garbage cans for the big potatoes, and the commercial bag system for the delicates varieties and fingerlings.

[Editor's note: This story is Part 1 of 3 and was written by A. Nonymus.]


Fingerlings in Burlap Bags

Wednesday, June 19, 2013

So How Does YOUR Garden Grow?

A. Nonymus

Our new garden venture this season: The Magnificent Potato

I planted two kinds of potatoes: large Russet “bakers” from Idaho and multi colored “fingerling” gourmet potatoes which were kindly provided by my Chef friend. The potatoes started on a whim, when I found some sprouted baking potatoes in the bottom of the bag, and seemed to have started growing strong and thriving shoots.

These volunteers were some especially beautiful large and tasty bakers, Idaho Russets from Sam's Club. Sis suggested that I just cut out the eyes 'n shoots and stick 'em in dirt and see what happens. I found some old pots, filled 'em with garden soil and plunked in the sprouted eyes, and much to my genuine surprise, they sent shoots up quickly and soon became quite bushy.

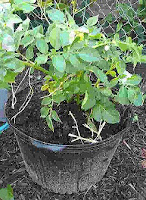
In short order, due to this sudden success, I had to transplant them from their starter pots to large tree sized pots. I was pleased to find they transplanted quite well, and the bushy leaves and stalks are now quite tall and robust. I have reasonable hope for a few nice Idaho Russets at the end of the growing cycle.

Nothing beats a great baked potato. I'm already planning to make the garlic, basil, and chive butters in anticipation … Yum Yum.

Transplant Potato
Transplant Potato

Saturday, June 15, 2013

Desks

My desk doesn't have drawers like a traditional desk. It's a table top with a pull out ledge that is only wide enough to hold a computer keyboard. I didn't realize how cluttered it looked until I took a photo of it the other day.

Actually, the clutter is organized. Adding a second computer to the desk top increased the number of cords and plug-ins that had to be pushed aside, but when I added the large flat screen TV that connected to one of the computers, things really got squeezed.

It has taken years to achieve this combination of what I call my 'comfort and proficiency' zone. I can't enumerate the items I have on the shelf above the computers. Some items have been there so long I have forgotten their purpose, but they were important at one time, and they might still be important, so it's best to leave them as is.


My Messy Desk
My Messy Desk

Wednesday, June 05, 2013

The Recipe Box: White Yeast Bread

White Yeast Bread
From the recipe box of MrsB/Esther

I baked bread the other day using a two loaf recipe my sister sent me.

Instead of making two loaves, I made one loaf and a pan of rolls. After baking, they looked like a magazine picture and tasted as good.

A few days before I had experienced a miserable failure with a recipe for cinnamon-raisin bread. Using the mixer to knead the dough was a technique in bread making that I had never used before and I hadn't used enough flour. The concoction I ended up with had to be tossed.

Now that I've had some success, I'll try the raisin bread recipes again. Using the mixer is a lot less work than the old fashioned way of kneading dough on a floured board.

Ingredients:

1 pkg active dry yeast
1/2cup warm water
2 tablespoons melted shortening
1tsp salt
2cups warm water
5 ¾ to 6 ½ cups all purpose flour
Note: milk instead of water may be used.
If powdered milk is used mix with flour.

Preparation:

  1. Soften yeast in ½ cup warm water.
  2. Using a mixer, keep adding flour until dough is smooth and elastic.
  3. Place dough in a greased bowl, and grease top of dough.
    Let rise until doubled in bulk.
  4. Punch down and shape into loaves. Recipe makes two loaves.
  5. Bake @ 375 degrees for 45 minutes or until golden brown.

Note: using the mixer eliminates kneading the dough on a floured board.


Finished Bread
Finished Bread

Saturday, June 01, 2013

Let me play among the stars

'Let me play among the stars' from the song, 'Fly Me To The Moon' has been running thru my mind since I started sewing diamonds for eight pointed star quilt tops. Three quilt tops to be precise.

This project came about in an interesting way. My sister Esther, mentioned that she had a large number of fabric diamonds cut out for eight pointed star quilt tops and asked if I would like some. Of course I said YES!

She mailed me enough cream colored diamonds to make 20 stars and enough diamonds in a beautiful rose color for 20 stars and enough in a lovely blue print fabric for 20 stars. She also cut out and mailed me the squares and triangles from fabrics she had on hand that goes nicely with each of the three star colors. Each star has to have 4 squares and 4 triangles to make a quilt block. It takes 20 blocks in rows of 4x5 make one double bed quilt top.

So you can see that I'll be playing among the stars for some time to come.

Esther is also sewing eight pointed stars for a quilt. We like to work on similar projects at the same time so we can compare notes in our computer chats. We live miles apart now, but in the past, we often working together on a quilt. Once we got our assembly line organized there was no stopping us as we took turns cutting out the pattern and running the sewing machine.

Sewing eight pointed stars can be tricky. All the center seams of the star must come to a point and the Y seams of the triangles must also match. If not sewn properly, there is a lot of ripping and re-sewing. I've had enough practice ripping in my life time, so I am being careful and sewing as precisely as I can.


Fly Me To The Moon
Fly Me To The Moon