Saturday, August 03, 2013

Crossword Puzzle Words

As I worked a crossword puzzle, I came across a word ending in "erer". As I wrote e,r,e,r in the blank squares of the puzzle book, I realized that I rarely use or spell a word ending in those letters. They seemed strangers to my every day vocabulary.

Wondering how many words I could think of with this ending, I spent a few hours listing the words I could think of, but when I got stumped I resorted to duckduckgo.com for an answer. The computer kept thinking I was asking about "ere', but with persistence, I was astonished to discover 168 words ending in "erer".

As an avid mystery book reader, I can't believe I missed thinking of the word "murderer"!


Arthur Wynne Inventor of the Modern Crossword
Arthur Wynne
Inventor of the modern crossword puzzle 1913

Saturday, July 27, 2013

The Perfect Pot by KimB

Recently I had the not so great pleasure of looking for a new cooking pot.

I had set up my now previous, perfect saucepan on the stove with 6 eggs, water and a dash of salt in it to make hard boiled eggs. I set the timer and well, no surprise, I forgot about it and didn't hear the timer go off. A fairly long while later, Allen heard POP, POW, POP in the kitchen; the water had evaporated off and the eggs exploded. It was a mess to clean up but the worst part was my perfect pot was ruined.

The perfect saucepan had rounded edges on the bottom that fit a stirring spoon shape just right. As the edges were rounded you could scoop out everything from rice to oatmeal and not have it stick into the corners. It had a non-stick coating that made clean up easy. It had a lid too. It was just perfect.

I have another cooking pot that is also perfect: a stew pot. While I'm not into Home Economics much, a few years back Allen had asked me what I wanted as a gift. I told him I wanted a big cooking pot that I could cook stew in. One that could be used on the stove or in the oven. Mom has a terrific recipe for Stew (see the pdfs on the sidebar) and I like making it but all the cookware I had just wasn't right. Either they didn't hold enough or they were too hard to clean or hard to handle in the oven. So I set out to buy a stew pot for my gift.

We went to an upscale kitchen supply store called Sur la Table. I asked the clerks there for a stew pot that could be on the stove or in the oven. We were in luck. They had one on sale, with a glass lid, non stick coating, handles, deep sides, rounded edges, worked on top of the stove or in the oven … in short it was PERFECT. It was also pretty pricey but Allen said to get it and we brought it home.

Sur La Table® Hard Anodized Braiser, 4½ qt.
Sur La Table®
Hard Anodized Braiser,
 4½ qt.
It's now my favorite big pot and I extol the virtues of this pot to whoever will listen. It's deep so food doesn't splatter over the edges. It's got the rounded edges so you can scoop the bottom easily. It has two sturdy metal handles so you can carry it from stove to work surface easily even when it's full of piping hot stew. I cook loads of stuff in it. It's my finishing pot. I cook up my spaghetti sauce in it: ground meat (turkey, sausage, beef and sometimes lamb), onions, garlic, celery, tomatoes and then dump the cooked pasta into mix. Heat. Stir. Serve. I cook meat loaf in it. I make soups and Chinese style stir fry. I cook leg of lamb in it and even make seared pepper steaks in it.

So, naturally after getting such a terrific first pot, our first stop was at Sur la Table to get a replacement for my burnt up saucepan. We asked the clerk for a saucepan and gave the description of what I wanted. He shook his head and said he didn't think he had a pot like that but he showed me what was available. We started at the high-end pots costing more than $200.00 and quickly moved down the price range to the el cheapo just under $125.00. None were perfect pots. They had straight L bottoms. They were guaranteed to stick (you have to have kitchen helpers to clean these). They weighed a ton. And last but not least, they were Not In The Budget.

So, we were clueless about what to do about my burnt up saucepan. I was feeling pretty low but Allen suggested we go to Target and see what was there. So, off we went. I didn't expect too much but perhaps something would work out. We went to the kitchenwares and there were several Name Band/Celebrity Chef Endorsed pots to chose from but on examining each there were “flaws”. Like Goldilocks some were too heavy, some didn't have a good lid, some had handles that were hard to hold. And while they weren't quite as expensive as Sur la Table, they weren't cheap. I decided not to take any of them.

I'd just about given up, when Allen called me to come check out another pot he'd found. It was on the really cheapo side of the aisle. He held out the pot for me to look at and I instantly knew THIS WAS THE PERFECT POT. It was light weight. It had a glass lid. The handle was sturdy and easy to hold. It was non-stick and had rounded edges. It was deeper than my previous pot which was a bonus. The pot has 2 pouring lips on each side and the glass lid had deep edges with vent or sieve holes where you drain off liquids or allow some steam to escape. The best part was the price. It was less than $15!

I am now, once again, the owner of two perfect pots!

[Editor's note: This story was written by KimB.]

Chefmate Aluminum 3-qt. Saucepan


Saturday, July 20, 2013

Theater: A Minister's Wife by Richard

We saw the musical A Minister's Wife at the San Jose Rep. The story is based on a George Bernard Shaw's play Candida. George Bernard Shaw was born in Ireland but moved to London to make his living.

This was the premiere showing on the West Coast. This musical production was enjoyable to watch and hear the cast sing the many sections of the play.

The story is about two men, the Minister and a friend, both of them would like the affections of the minister's wife, Candida. The time and place, the drawing room of Dominic's Parsonage on a fine morning 1894.

We left the theater feeling well entertained and then headed home for a good night sleep

[Editor's note: This story was written by Richard]


A Minister's Wife
A Minister's Wife
 

Wednesday, July 17, 2013

The Recipe Box: (Not So) Quick Spanish Rice

(Not So) Quick Spanish Rice
From the recipe box of KimB

I've been learning about rice recipes and experimenting with them to make them more my own. One recipe I've been working on is Spanish Rice. It's not that easy to do or do well but I keep working away at making it easy for me and tasty too.

One criteria is that is has to be easy to put together. My days of standing for hours in the kitchen are fast fading in the rear view mirror. So, anything I undertake has to fit into the limited time I'm willing to put into cooking.

Second criteria is that it has to taste good. A bad recipe is just not going to get a rerun, especially during the summer heat when you can cook eggs on the sidewalk.

Third criteria is that the recipe has to be forgiving about what I have on hand and what I can use as a substitute.

This is my current incarnation which I think is pretty good.

(Not So) Quick Spanish Rice

1 cup organic jasmine rice
2 tbs olive oil
1 tsp salt
1 tsp ground cumin
1 tsp ground coriander
1 jar organic salsa (mild, medium or hot)
1 ¼ cups water

Preparation:
  1. Rinse the rice in cool water until the water runs clear.
  2. Place the rice in pot and drizzle with the olive oil, add the salt, cumin and coriander.
  3. Turn the heat on medium and stir until the rice turns white and is well coated with the herb mix.
  4. Add 4 tbs to 6 tbs of the salsa mix to the rice and stir until most of the liquid is absorbed.
  5. Add the 1 ¼ cups of water, stir and bring to a boil.
  6. Put the lid on and turn the burner down to lowest level.
  7. Cook with the lid on for 15 min. Remove from the burner.
  8. Let set with the lid on for 5 to 10 min.

Spanish Rice
Spanish Rice

Saturday, July 13, 2013

Calamities

I wonder if the proportion of calamities we are presently experiencing is the same as it might have been when men carried swords for self defense, and highway robbers stalked carriages. When natural catastrophes like wild fires, floods, tornadoes and hurricanes occurred, only people in their vicinity were aware.

Just like today, ethnic groups migrated and warred over territory, creating havoc as man made religions clashed. The human condition, theoretically, has improved, but the same degree of power and privilege still exists, causing an unbalance of 'have and have nots' around the globe.

Of course advances in science, medicine and labor saving devices have eased the daily struggle to survive, but global television news coverage of barbaric atrocities of persons searching for better living conditions, destruction of huge areas of habitat due to extreme weather conditions, murder and mayhem for political dominance is such a constant litany of world wide calamities, it suffocates and overwhelms. The threat of nuclear catastrophe is always with us.

In the grand scheme of things, events come and go and history records them. I guess its human nature to adapt and survive. We do find ways to overcome the stresses and actually find ways to pursue happiness. Like my grandmother used to say, “a hundred years from now it won't make any difference”.


South Dakota Tornado
Photograph by Carsten Peter


Monday, July 08, 2013

Learning how to grow potatoes Part 3 by A. Nonymus

Planting Idaho Russets

The volunteer russets got re-planted in large tree tubs and in about a week they are already full up with soil mix to the top, and the plant stems still rising about 18-20” above the lip!?. I can see now that much deeper containers would be better, but so far they seem to be thriving quite nicely, although the tops are so 'leggy' now that some are starting to lean and fall over with apparently with no damage.

Yield should be, according to the information, about 5 good potatoes from each stalk. I have about 10 stalks in each burlap bag with fingerling potatoes. I'm hoping for a yield of about 50-ish fingerlings from each bag. The tubs of Idaho's only have about 5 large plants each, so I'm hoping for about 20+ per tub, although some sources suggest that grocery store potatoes, if they grow at all, never 'grow right'.!?

Everything I read reminds also to keep some as starters for next year. We shall see. Harvest time is best in September and October, so plenty of time to grow. I'm reminding myself however not to 'count chicks before they hatch”.

Next year I will likely try the 'garbage can' techniques for the large Idaho Russets, but continue to use potato bags for the smaller fingerling and gourmet 'taters'. Online I found a specially made bag just for potato gardening. It's designed to provide air and drainage, and is reusable. It's apparent even now that the burlap bags will probably be a one time use, as the burlap is clearly wearing from water, sun, and weather, although – so far - they are keeping the dirt and potatoes enveloped, and appear strong enough to make the whole season.

The potato harvest endgame is, theoretically designed, to just dump the bag or container out and voilĂ  ... ya just collect the potatoes!

[Editor's note: This story is Part 3 of 3 and was written by A. Nonymus.]
In an old country song, "The Arkansas Traveler", there is a talking narrative between musical verses, where the city slicker is dialoging and questioning the farmer on the porch, and trying to be friendly he asks the farmer...

“How did your 'taters turn out?”... and the old curmudgeon farmer replies... 'They didn't turn out... I had to dig 'em out!!”

Thursday, July 04, 2013

Saturday, June 29, 2013

Learning how to grow potatoes Part 2 by A. Nonymus

Planting Fingerlings

I pre-sprouted the fingerlings in an old egg carton in a process know as 'chitting' – a way of creating green sprouts prior to planting - it was recommended to separate by colors and not let them touch each other. They had been mixed when I got them, but I separated by colors. It only took about a week for the fingerlings to begin sprouting in the egg carton. The yellow and red sprouted quickly. The blues didn't sprout but they got planted anyway.

Once they started showing shoots in the egg carton, I planted them in the 3 bags, one bag with the yellow, one bag with the red, and one with the blue. I rolled the bag sides down, like old socks, and filled each with about 6” of garden soil and straw mixture.

From the very start, the yellow fingerlings seem the more robust, with the reds not far behind. The blues are much slower and may not do so well.

After about 6 weeks, it's time to add more soil to the bags to keep the stems covered. And this is the brilliant part: roll up the bags as the dirt is added to keep the stems covered constantly as they grow. When the bag is completely unrolled and filled to the top with soil/straw mix, the stems will have been kept covered to the 'max', which in theory, provides maximum yield. So far everything is going to plan.

I'm not really sure yet when to harvest potatoes, but one source suggested waiting until the top growth is dead, and another source suggests harvest as they grow to induce more tubers. I'm leaning toward the view that its best to just wait until the plants and leaves die completely, which provides maximum energy and growth time to the tubers... and lets face it, it's a lot easier on the harvester too.

[Editor's note: This story is Part 2 of 3 and was written by A. Nonymus.]


Fingerlings
Fingerlings

Wednesday, June 26, 2013

So How Does YOUR Garden Grow?

A. Nonymus

We have a robust and vigorous garden this year – with some special projects and new frontiers to conquer. Everything is in containers and the garden is thriving.

In spite of crazy Gulf Coast storms, unseasonable cold and early heat, bad techniques by the farmer, false starts, sundry bugs, birds, over watering, and haphazard fertilizing, the container garden is just thriving beyond any reasonable expectations, reminding me of the line in Jurassic Park... “life will find a way”!. Ain't it the truth!?

Our containers use commercial garden soil, some also mixed with water retaining soil mix. Most veggies are in good ol' garden soil. All the potatoes are layered in a mix of garden soil and straw. I'm using a granulated (dissolve in water to apply) fertilizer about every 2 weeks (when I remember).

As a first, we have been having fun with potatoes this season. Our first ever effort with potatoes on any 'serious' level. Many years ago I had tossed some seed eyes in the ground, and got a few puny potatoes. The results were so disappointing I never tried again. However, this year – on a whim - I decided to try again with a bit more serious effort.

I'm growing the potatoes in containers; some in large tubs, and others in bags. I'm really focusing on the “bag” system, which so far has exceeded any expectations by a mile. All the fingerlings are in burlap bags, and the Idaho's are in the big 5 gallon containers. I'm really pleased that all of the 'taters' seem to be thriving, much to my astonishment. I have been learning more than I ever expected about growing potatoes.

Happy gardening!


Cucumbers
Cucumbers


Saturday, June 22, 2013

Learning how to grow potatoes Part 1 by A. Nonymus

In researching how to grow potatoes in a container, I found a lot of great information online, and discovered that one person had great success with fingerlings in bags. I scrounged up 3 old burlap bags and followed the instructions on a YouTube video, filling the bags with a mixture of straw and garden soil to about 6” deep to start. The plan is to add soil and roll up the sides of the bag as the stalks grow. Then we planted each whole fingerling about 10 per bag, and covered by several inches of soil mix.

I learned that it's important to keep piling soil up around the stem of the potato plant – which induces more potatoes, as the tubers grow from the covered stalk. The bag system is perfect, since you roll down the sides of the bag to start, but then add dirt as the stems grow unrolling the bag upward. In theory, when the bag is fully unrolled and full, you will have a nice yield from each plant.

This concept of mounding dirt around the plant stem is also applied to the 'garbage can' system. Start with a little dirt in the bottom, and keep filling as plants grow. Tip the can over to harvest. Of course the can needs good drainage. Some special tubs are available online, but I think I'll get a 40 gal. plastic trash can and drill good drain holes at the bottom along the sides for next year.)

But just try to find burlap bags!

After asking all around and calling various vendors with no luck or leads, I finally got lucky at a local feed store, and they gave me 3 old burlap feed bags. I was surprised that I couldn't find burlap bags anyplace. Problem solved this year, by a stroke of luck.

I recently found a source online for reusable 'potato' bags made exactly for container potatoes. I'm sure that next year I will give those a try, as it's already apparent that burlap, at best, is a one season use item.

After 2 months, the bags are holding – but just. So next year garbage cans for the big potatoes, and the commercial bag system for the delicates varieties and fingerlings.

[Editor's note: This story is Part 1 of 3 and was written by A. Nonymus.]


Fingerlings in Burlap Bags

Wednesday, June 19, 2013

So How Does YOUR Garden Grow?

A. Nonymus

Our new garden venture this season: The Magnificent Potato

I planted two kinds of potatoes: large Russet “bakers” from Idaho and multi colored “fingerling” gourmet potatoes which were kindly provided by my Chef friend. The potatoes started on a whim, when I found some sprouted baking potatoes in the bottom of the bag, and seemed to have started growing strong and thriving shoots.

These volunteers were some especially beautiful large and tasty bakers, Idaho Russets from Sam's Club. Sis suggested that I just cut out the eyes 'n shoots and stick 'em in dirt and see what happens. I found some old pots, filled 'em with garden soil and plunked in the sprouted eyes, and much to my genuine surprise, they sent shoots up quickly and soon became quite bushy.

In short order, due to this sudden success, I had to transplant them from their starter pots to large tree sized pots. I was pleased to find they transplanted quite well, and the bushy leaves and stalks are now quite tall and robust. I have reasonable hope for a few nice Idaho Russets at the end of the growing cycle.

Nothing beats a great baked potato. I'm already planning to make the garlic, basil, and chive butters in anticipation … Yum Yum.

Transplant Potato
Transplant Potato

Saturday, June 15, 2013

Desks

My desk doesn't have drawers like a traditional desk. It's a table top with a pull out ledge that is only wide enough to hold a computer keyboard. I didn't realize how cluttered it looked until I took a photo of it the other day.

Actually, the clutter is organized. Adding a second computer to the desk top increased the number of cords and plug-ins that had to be pushed aside, but when I added the large flat screen TV that connected to one of the computers, things really got squeezed.

It has taken years to achieve this combination of what I call my 'comfort and proficiency' zone. I can't enumerate the items I have on the shelf above the computers. Some items have been there so long I have forgotten their purpose, but they were important at one time, and they might still be important, so it's best to leave them as is.


My Messy Desk
My Messy Desk

Wednesday, June 05, 2013

The Recipe Box: White Yeast Bread

White Yeast Bread
From the recipe box of MrsB/Esther

I baked bread the other day using a two loaf recipe my sister sent me.

Instead of making two loaves, I made one loaf and a pan of rolls. After baking, they looked like a magazine picture and tasted as good.

A few days before I had experienced a miserable failure with a recipe for cinnamon-raisin bread. Using the mixer to knead the dough was a technique in bread making that I had never used before and I hadn't used enough flour. The concoction I ended up with had to be tossed.

Now that I've had some success, I'll try the raisin bread recipes again. Using the mixer is a lot less work than the old fashioned way of kneading dough on a floured board.

Ingredients:

1 pkg active dry yeast
1/2cup warm water
2 tablespoons melted shortening
1tsp salt
2cups warm water
5 ¾ to 6 ½ cups all purpose flour
Note: milk instead of water may be used.
If powdered milk is used mix with flour.

Preparation:

  1. Soften yeast in ½ cup warm water.
  2. Using a mixer, keep adding flour until dough is smooth and elastic.
  3. Place dough in a greased bowl, and grease top of dough.
    Let rise until doubled in bulk.
  4. Punch down and shape into loaves. Recipe makes two loaves.
  5. Bake @ 375 degrees for 45 minutes or until golden brown.

Note: using the mixer eliminates kneading the dough on a floured board.


Finished Bread
Finished Bread

Saturday, June 01, 2013

Let me play among the stars

'Let me play among the stars' from the song, 'Fly Me To The Moon' has been running thru my mind since I started sewing diamonds for eight pointed star quilt tops. Three quilt tops to be precise.

This project came about in an interesting way. My sister Esther, mentioned that she had a large number of fabric diamonds cut out for eight pointed star quilt tops and asked if I would like some. Of course I said YES!

She mailed me enough cream colored diamonds to make 20 stars and enough diamonds in a beautiful rose color for 20 stars and enough in a lovely blue print fabric for 20 stars. She also cut out and mailed me the squares and triangles from fabrics she had on hand that goes nicely with each of the three star colors. Each star has to have 4 squares and 4 triangles to make a quilt block. It takes 20 blocks in rows of 4x5 make one double bed quilt top.

So you can see that I'll be playing among the stars for some time to come.

Esther is also sewing eight pointed stars for a quilt. We like to work on similar projects at the same time so we can compare notes in our computer chats. We live miles apart now, but in the past, we often working together on a quilt. Once we got our assembly line organized there was no stopping us as we took turns cutting out the pattern and running the sewing machine.

Sewing eight pointed stars can be tricky. All the center seams of the star must come to a point and the Y seams of the triangles must also match. If not sewn properly, there is a lot of ripping and re-sewing. I've had enough practice ripping in my life time, so I am being careful and sewing as precisely as I can.


Fly Me To The Moon
Fly Me To The Moon

Wednesday, May 29, 2013

The Recipe Box: Green Chicken Chili


Green Chicken Chili
From the recipe box of MrsB

While Esther and I talked recipes, I told her about a soup I had when I lunched at Luby's the other day. It was called Green Chicken Chili . I Googled Luby's for the recipe and discovered they have several variations of the recipe. The kind I had was White Green Chicken Chili with a creamy milk base.

Ingredients:

1/2 cup butter
3/4cup all purpose flour
2 cups milk
3cups chicken broth
2 cups diced cooked chicken
1//2 cup chopped green chilis
salt and pepper to taste
pinch of garlic powder

Preparation
  1. Over medium heat, melt butter and stir in flour. Add milk and chicken broth, stirring to avoid lumps.
  2. Reduce heat, add chicken and chilies. Bring to simmer and serve.
  3. The more chilis added, the spicier the soup.
  4. Optional: Heavy whipping cream and a can of green enchilada sauce.

Green Chicken Chile
Green Chicken Chile

Saturday, May 25, 2013

And they say dogs are dumb by KimB

Spring doesn't last long in the central valley of California. The summer is already announcing it's arrival with temperatures reaching the 90s.

We've made some adjustments to the house in hopes of avoiding the worst of the 115F heat to come. We added some fans, some new honeycomb window coverings on 3 windows that face west and get the full blast of the afternoon sun.

There's no other way to say it.... It's Just Hot!

As transplants from the cooler ocean side of California it always amazes us at how people here handle the heat, or rather don't. Both Allen and I lived in Arizona and we retain the old custom of "walk in any shade you can find."

It used to be a standard joke that you could tell people from Arizona because they would walk from one tiny bit of shade to another, even if it meant walking an extra 50 feet. When we get out of the car at a mall, we walk from one lollipop tree to next lollipop tree just for an extra 3 steps of shade.

For some reason, people here seem oblivious. They by pass any shade even if it's 1 foot away. They go out in the hottest part of the day. They run and jog and do parkour even when the trees are wilting.

The worst part is they take their dogs with them or rather tow the dogs with them. It's so hot the dogs are leaning towards any shade they see. When the owners stop at a crossing to wait for the light, the dogs are picking up their paws because the sidewalk is so hot. An owner stops for 100 pushups and the dog lies down, tongue hanging out, at the farthest end of the leash, to get to some shade. The owner just keeps doing pushups in the full blast of the heat of the day. You can almost hear the dog say to their owner, "Yeah, just keep on doing those pushups, I'm cool over here, you get all hot if you like."

The owners come dressed for heat. The standard attire here all year round consists of shorts and a tee, sandals/light weight sneakers. Hats are optional. Even most businesses recognize shorts as standard business attire. The dogs are not always so fortunate. Heavy coated Huskies and St. Bernard's get towed thru the worst of the heat. The local pet groomers do a landslide business in shaving long haired dogs for the summer.

There seems to be an inverse correlation between heat and sense. The dogs know to get out of the heat, the people don't. And they say dogs are dumb....

[Editor's note: This story was written by KimB.]


Spring in the Central Valley

Wednesday, May 22, 2013

Between a rock and... a potato? by KimB

I'm a city kid. My family came from farming backgrounds and I like to pretend I'm a “country girl” but really I'm just a city kid from the suburbs of Los Angeles.

Like the story Game of Thrones, I “know nothing John Snow”, about gardening. Everything I've learned has been from books or by trial and error. I have had some pretty good luck with all that book learning for growing things, except for one: I cannot grow potatoes (hangs head in embarrassment).

The long epic story of potato growing attempts came from years back, when I watched a TV gardening program, that showed “how easy” it was to grow them in a container.

“OK,” I thought. “That's the ticket. I'm growin' some spuds!”

Well, years later and my spud growing attempts have never been all that good. Yet, I keep trying. I go for the challenge now. Hope is a marvelous thing.

I've tried a number of techniques over the years, based on tips from other gardeners who claim they get huge spuds. I think these stories of “giant spuds” must be akin to the “giant fish that got away” stories that fishermen tell. Yet, I duly note down new ideas or things to do to help with the taters. Nothing much has mattered so far.

I recently, asked a friend from Belarus, how do they grow potatoes there.  Everyone knows they grow loads of potatoes in that part of the world and her family has a small farm where potato growing is a necessity for food.

We went down the list of things I was doing. Dirt – yes. Potatoes for planting – yes. Fertilizer (organic) – yes. Water – yes. It didn't seem there was much I was missing, except the output part: actually getting more potatoes than I started with.

So, we moved along from the growing part to the harvesting part. For the biggest ones, harvest when the plants die back - check. Small ones you can get when the potatoes bloom - check.

After that she was stumped. “That's all there is to it.” she told me.

I said, “There must be something else? Something that I'm not getting right? I plant them, fert them, care for them and water them. There's something not right. If I were living in Belarus, I would have starved by now!”

Then after a pause, she said, “Well, you don't have to water them too much.” LIGHT BULB!

After a quick review of my watering routines, she determined that I was giving them too much water. Of course, I was pretty sure this really wasn't the problem but I agreed to cut off the water to see what happened.

Soon the plants died. Great! Or maybe not... Just dried old sticks in a pot. How attractive.

On a whim, I stuck my hand into the dried out compost left in the pot, just to test. The first thing I felt was this large rock. I wiggled my fingers around this rock, it was pretty good size rock. I couldn't figure out how a “rock” got into one of my planting containers. Did someone throw a rock in when I wasn't looking? How could a rock get in here? I wiggled my fingers around the rock to remove it from my pot. I was pretty annoyed that someone, some how, had put a huge rock in my pot.

After a good yank, I got the rock out.... I nearly fell over in shock with what I had in my hand: A potato! A REAL potato! And there was not just one, but a lot of potatoes! And more and more potatoes kept coming out of the container!

Addendum:
It tasted WONDERFUL. Just nuked with a bit of butter. And, I have another container of potatoes that I'm looking forward to rock hunting in.

[Editor's note: This story was written by KimB.]
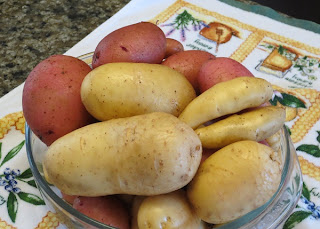

Potato Harvest May 2013

Saturday, May 18, 2013

Sewing Machine Woes Update

My trials and tribulations with my sewing machine continues.

I anticipated sewing with my new $80 machine with the re-designed spool spindle sans frustration, but it wasn't long before I was spending more time 'fixing' the machine to sew than I actually sewed.

The project of sewing diamonds together to form 8 pointed stars should have gone smoothly, but I had to re- thread the machine as each diamond was joined.

At first, I thought adjusting the various dials according to the manual was the solution, but, alas, that was not the answer. Perhaps a burr on an internal casting either cut or broke the thread every time I re-positioned a diamond to sew on another.

What to do Percy? What to do?

I liked the machine and thought an exchange at the store might be in order. What were the odds of an identical machine having the same problem? While pondering this question, a friend, who restores and sells Singer Featherlight machines, offered to sell me a Singer 301A for a reasonable price.

No need to ask What to do, Percy? What to do? Before he could change his mind, I accepted his offer.

This machine is the best sewing machine ever made and I”m lucky to have one. It only sews a straight seam, no zig zag stitches and it lacks an automatic needle threader, but for my quilting purposes I couldn't ask for a better machine.

I'll find out if my sewing woes are over when I get the machine and start sewing.


Singer 301a Sewing Machine


Wednesday, May 15, 2013

So How Does YOUR Garden Grow?

Kim

A picture is worth a thousand words... I wish there were a thousand bites to share.


Mini Zucchini
Mini Zucchini


Saturday, May 11, 2013

Sewing Machine Woes

My sewing machine broke, but I didn't realize it was broken. I thought a thread jam was the reason it wouldn't sew, but after cleaning the bobbin race, it was obvious something was wrong, possibly broken.

I hoped what ever the cause, it could be repaired, but the clerk at the repair shop said that labor and the replacement part would cost more than a new sewing machine and suggested I just buy another machine.

A new machine similar to my broken one was $74 at Walmart and the bill at the repair shop would have been $100. The decision to buy new was a no brainer.

After diligently comparing the stats of the various machines, I chose a later model of the same brand as my old one, and was a happy camper as I looked forward to working on my latest sewing project.

New features in design promised ease of sewing, but the 'updated' changes in the design of the bobbin race were too radical for me. It was frustrating and I longed for the old style. After researching sewing machines online, I found one, but it too had 'updated' the spindle for holding a spool of thread.

I finally resigned myself to acceptance of the world wide penchant for changing what works to what 'modern' technology calls progress. I returned the $74 sewing machine and purchased the $80 model I had seen on the net.

I'm back sewing on my project, and so far, so good. The sewing is going smoothly and the machine is enough like my favorite old fashioned style that I can cope with the spool holder as needed. I don't see the reason for having changed it, but I suppose beginner seamstresses will think it the best style, never having known the best, original design that never failed until some bright person thought a change was necessary.


Sewing Machine Bobbins